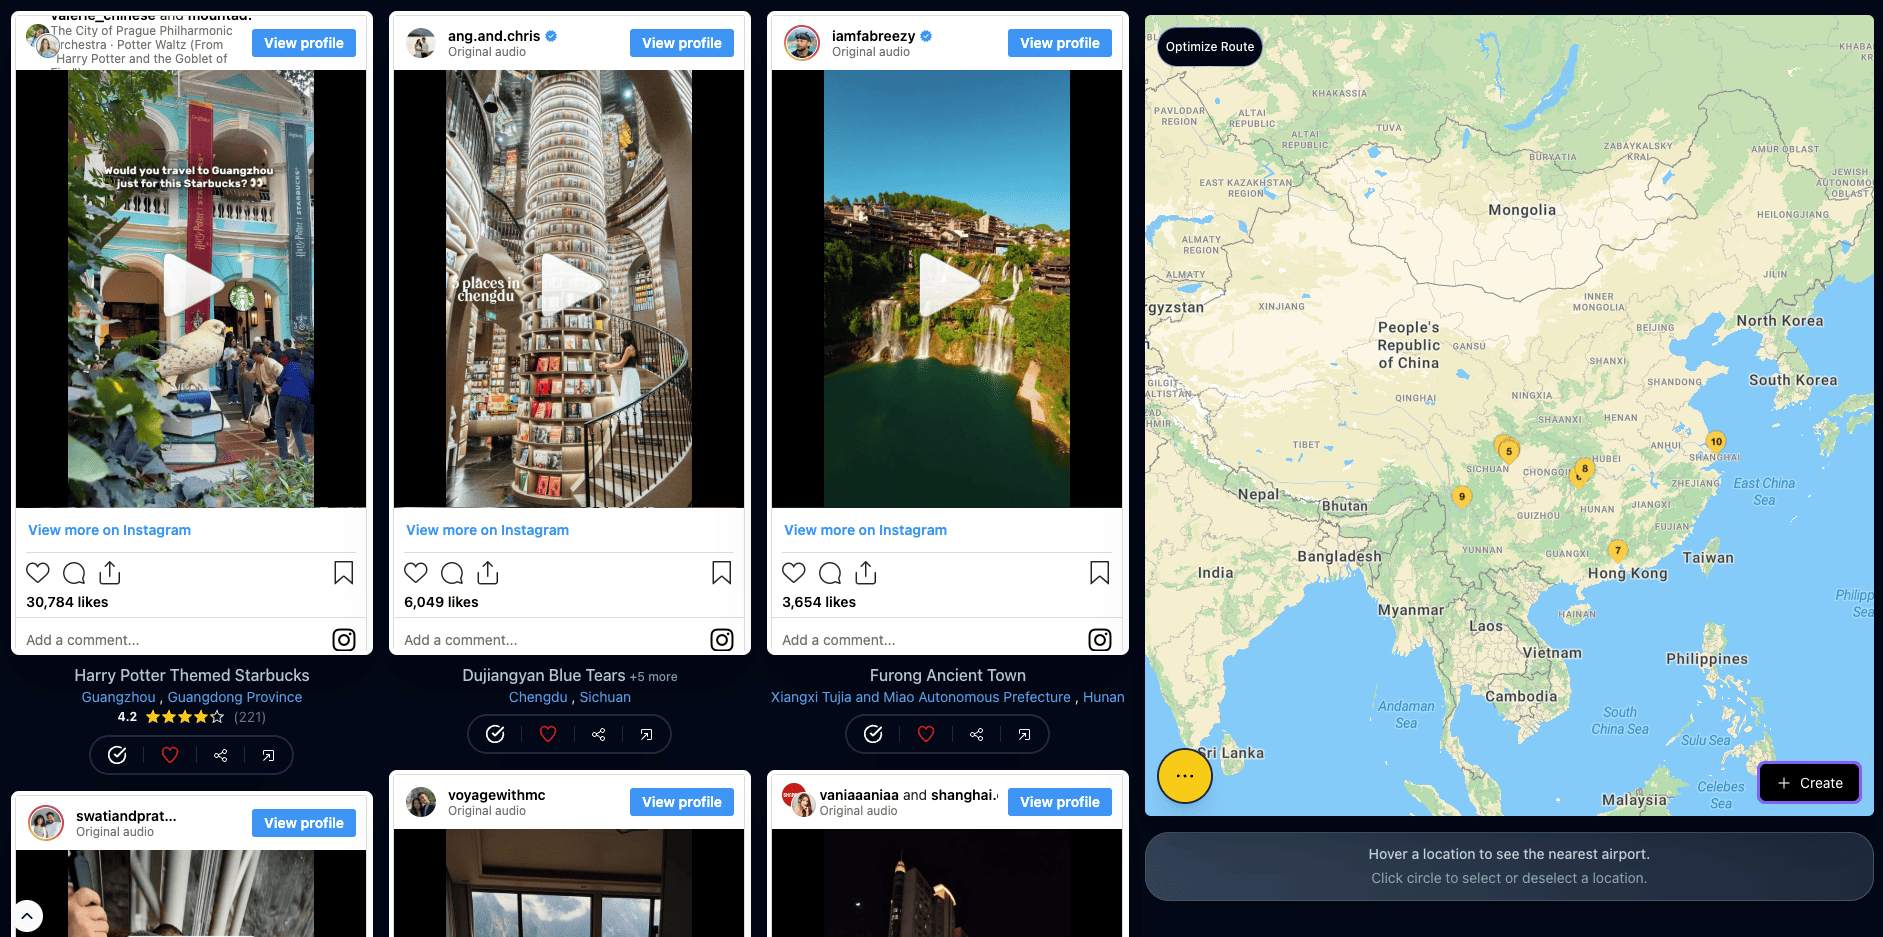
The short answer: to turn saved Instagram reels into a map, open the free Map Your Voyage planner and add your reels two ways. Paste the links to the reels you've saved (or DM them to Map Your Voyage on Instagram) and each location is detected automatically from the footage, caption and on-screen text and dropped onto an interactive map. Or pick a country and tap the curated reels — these carry human-verified geolocations — to add confirmed pins with no typing. Every place collects on one map, sorted by country. When you're ready, one click turns that map into a day-by-day itinerary.
You did the satisfying part months ago: you saved the reels. The cliff-diving cove, the rooftop ramen bar, the pastel street that looked unreal. Now the trip is real and the folder is… forty silent thumbnails. You can't tell where half of them are, let alone how they fit together. The missing step is a map — the moment a pile of videos becomes pins you can actually see, group and route. This guide shows the fastest ways to get there (most of them automatic), plus the slow manual way for comparison.
Want to skip ahead? Open the planner, paste the links to the reels you've saved (or tap a few curated ones), and watch every location land on a single interactive map. Free, no account needed.
Map my saved reels →Why a Map Beats the Saved Folder
A saved folder is a vertical scroll. A map is a shape. That difference is everything when you're planning a trip.
In the folder, two places that are a ten-minute walk apart look exactly like two places that are a six-hour drive apart — identical thumbnails, stacked in the random order you happened to save them. On a map, the same places snap into clusters. You can suddenly see that five of your saves are all in one neighbourhood and one lonely pin is three hours north, blowing up your whole route. Geography is the one thing a route is made of, and a flat list hides it completely.
A map also reveals the truth most folders hide: you weren't saving for one trip. You were saving for three. Once the pins are down, the Italy cluster, the Japan cluster and the Peru cluster separate themselves, and you can plan the one you're actually taking instead of drowning in the other two. (For the bigger argument on why a folder of saves never becomes a trip on its own, see why saving reels isn't a travel plan.)
The One Thing Every Reel Is Missing
Here's the catch that makes “just put them on a map” harder than it sounds: a reel rarely tells you where it is. Most creators never add a geotag, the tagged location is often a city rather than the actual spot, and the caption is usually a mood, not an address. You're looking at a gorgeous waterfall with no idea which country it's in.
So before a reel can become a pin, its location has to be extracted. You can do that by hand — read the caption, pause for on-screen text, reverse-image-search the landmark, or DM the creator — and our full walkthrough of how to find where an Instagram reel was filmed covers all of those. But doing it forty times is the exact chore that keeps the folder a folder. The methods below remove that step entirely.
4 Ways to Turn Saved Reels Into a Map
Three of these are automatic and take seconds; the fourth is the manual route, included so you can see exactly what the others are saving you. All three automatic methods happen inside the free Map Your Voyage planner.
Method 1 — Paste the links to reels you've saved
This is the fastest way to deal with a folder you already have. Copy the link to any saved reel and paste it into the planner. The location is detected automatically from the actual footage, the caption and any on-screen text — not from a geotag the creator probably skipped — and the place drops onto the map as a pin. It works for Instagram reels and posts, and also for YouTube videos and travel blog posts, so your whole research pile can land on one map. Because these locations are worked out by AI from the content, they're a brilliant head start; just sanity-check anything ambiguous before you book.
Method 2 — DM reels to Map Your Voyage as you scroll
You don't have to wait until planning day. When a reel stops you mid-scroll, share it straight to Map Your Voyage on Instagram as a DM. Its location is detected the same way and it files itself into a country-specific bucket list, so instead of a flat folder you end up with saves that already know where they are — ready to appear on a map the moment you open the planner. Think of it as saving, but with the location attached.
Method 3 — Tap curated reels (human-verified pins)
Sometimes the best move is to start fresh rather than salvage an old folder. On the planner and on each country page, you can scroll a stream of hand-picked travel reels, videos and photos. Every one of these carries a human-verified geolocation — a real person has confirmed exactly where it is — so tapping the circle beneath any you love drops a confirmed pin on the map. No links, no typing, no second-guessing. It's the most reliable way to build a map fast, and a good complement to your own pasted saves.
Method 4 — The manual way (Google My Maps)
For completeness: you can build the map entirely by hand. Open each saved reel, figure out the location (the missing-step problem above), search the place name in Google My Maps, drop a pin, name it, and repeat for every save. It's free and you keep full control, but it's slow, and the result is a static set of pins that still can't sequence your days. If you want to weigh it up properly, we break it down in Google My Maps vs Map Your Voyage and Google Maps saved places vs Map Your Voyage.
Pick the fast lane: paste your saved reel links or tap a few curated ones, and watch every location appear on a single interactive map. Free and unlimited.
Build my map →From a Map to a Real Trip
A map is the goal of this guide, but it's rarely the finish line — it's the launchpad. Once your pins are down, three quick moves turn them into a trip:
- Separate this trip from someday. Use the country dropdown to keep each destination's pins in their own bucket. Plan the cluster you're travelling to now; let the rest wait. (Genuinely visiting several countries? See how to plan a multi-country trip.)
- Shortlist what fits your days. Aim for 5 to 10 places per country — enough to shape real days, few enough to leave room to wander. The cuts aren't lost; they stay in the bucket list for next time.
- Click Create. Your map becomes a day-by-day, hour-by-hour itinerary, sequenced so nearby pins share a day instead of zig-zagging across town. Drag and drop to fine-tune, and generate as many versions as you like — it's free and unlimited.
Not ready to commit to one trip yet? The travel inspiration feed is a global stream of curated reels — like the ones you fancy and they save into the right country's bucket list automatically, so the map is already half-built whenever you decide to plan. For the complete end-to-end workflow, see how to plan trips from Instagram.
Manual Map vs Automatic Map
Same forty saved reels, two very different afternoons. Here's what each approach actually asks of you:
| Step | By hand (Google My Maps) | Automatic (Map Your Voyage) |
|---|---|---|
| Finding each location | You watch and research every reel | Detected from the footage and caption |
| Dropping the pin | Search and place each manually | Paste a link or tap a curated reel |
| Location accuracy | Only as good as your guess | Curated reels are human-verified |
| Sorting by country | Manual layers or labels | Automatic country buckets |
| Turning it into days | Not possible — pins only | One-click day-by-day itinerary |
| Time for 40 saves | An evening or two | Minutes |
| Cost | Free | Free (booking concierge optional) |
If you like comparing every option in this space before you commit, we've rounded up the best apps to plot locations on a map and optimize routes and the best apps to plan trips from social media.
Common Mistakes to Avoid
- Trusting the geotag. Many reels have none, and the ones that do often tag a whole city. Pasting the link reads the actual footage instead, which is why it places reels the geotag would miss.
- Mapping all fifteen countries at once. A map is most useful when it's one trip. Let the country buckets do the sorting, then plan a single cluster at a time.
- Dumping two hundred pins on the map. A map you can't act on is just a prettier folder. Shortlist 5 to 10 places per country so the route stays sane.
- Stopping at the pins. A map of locations isn't an itinerary. The value comes from sequencing those pins into days — don't skip the Create step.
- Booking off an unchecked AI guess. Automatic extraction is a fast, accurate head start, but for anything ambiguous, glance at the pin before you build the day around it. Curated reels are already human-verified, so they need no second look.
Frequently Asked Questions
How do I turn saved Instagram reels into a map?
Open the free Map Your Voyage planner and add your reels one of two ways. Paste the links to the reels you've saved (or DM them to Map Your Voyage on Instagram) and each location is detected automatically from the footage, caption and on-screen text, then dropped on an interactive map. Or pick a country and tap the curated reels — which carry human-verified geolocations — to add confirmed pins with no typing. Every place collects on one map, organized by country, in a few clicks.
Can I put my Instagram saved reels on a map for free?
Yes. Mapping places from saved reels, building country-specific bucket lists, and generating day-by-day itineraries are all free, and no account is required to start. You only pay if you later choose the optional concierge service to have the trip booked for you.
Does it find the location automatically, or do I type it in?
Automatically. When you paste a reel link or DM it, the location is detected from the actual footage, the caption and any text in the video — you don't type anything. Curated reels go further still: their locations are human-verified before they're shown, so tapping one drops a confirmed pin on the map.
What if the reel doesn't have a geotag or tagged location?
Most reels don't, which is exactly why pasting the link works better than relying on the geotag — the location is detected from what's actually in the video and caption rather than a tag the creator may have skipped. If you'd rather identify a place by hand, our guide to finding where an Instagram reel was filmed walks through six manual methods plus the automatic one.
Can I add reels from more than one country to the same map?
Yes. Add places from one country, switch to another from the dropdown, add more, and so on. Your selections stay sorted into country-specific buckets, so a folder of mixed destinations becomes an organized map instead of a jumble. When you're ready, build an itinerary for the country you're actually travelling to this trip.
How is this different from dropping pins in Google My Maps?
In Google My Maps you do every step by hand: watch each reel, work out where it is, search the place, and drop a pin — for all forty saves. Map Your Voyage removes that work by extracting the location from the reel itself and plotting it for you, then it can sequence the pins into a day-by-day itinerary, which Google My Maps can't do at all. See the full breakdown in Google My Maps vs Map Your Voyage.
How do I turn the map into an actual trip?
Once your saved reels are pins on the map, keep 5 to 10 places for the country you're visiting and click Create. Map Your Voyage turns the map into a day-by-day, hour-by-hour itinerary, sequenced so nearby places share a day, which you can fine-tune by dragging and dropping. If you'd rather have it booked for you, an optional concierge returns a free quote with hotels, flights and activities within 24 hours.
Turn the folder into a map — then a trip.
Paste the reels you've been hoarding (or tap a few curated ones), watch every location land on a single interactive map, and turn the whole thing into a day-by-day, hour-by-hour itinerary — free and unlimited. And if you'd rather have humans book the hotels, flights and activities, the concierge quote is free and arrives within 24 hours.